• Skip to primary navigation
  • Skip to main content
  • Skip to primary sidebar

Simply Designing with Ashley

  • DIY
  • Oils
  • Recipes
  • Craft
  • Travel
  • Decor
  • Holiday
menu icon
go to homepage
  • DIY
  • Oils
  • Recipes
  • Craft
  • Travel
  • Decor
  • Holiday
search icon
Homepage link
  • DIY
  • Oils
  • Recipes
  • Craft
  • Travel
  • Decor
  • Holiday
×

Christmas Glass Blocks

Published: Dec 7, 2009 by Ashley Phipps · 760 words. · About 4 minutes to read this article. · 14 Comments · This post may contain affiliate links · This blog generates income via ads and sponsored posts · This blog uses cookies · See our privacy policy for more info Filed Under: Craft, Home Decor

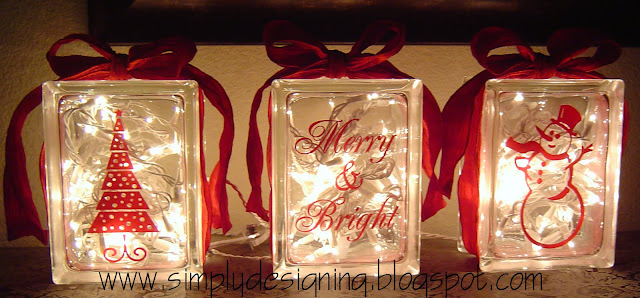
Today’s simple holiday home décor item: Christmas Glass Blocks!
Glass+blocks+Done+Lights+on+copy Christmas Glass Blocks 27
These were a lot of fun to make and very easy to do since I enlisted the help of my good friend NataLee.  She owns her own business and does many things including designing and cutting vinyl.  I have been enlisting her help a lot recently on several projects.  You can see her handy work in today’s project but you can also check out her website here.

I have seen several people do glass block decorations, so I thought I would try my hand at them.  I absolutely love using glass blocks for Christmas since you can put Christmas lights in them and when you turn them on, they sparkle!  (Of course this can be done for any holiday or any reason; the applications are endless!)

For this project I used (3) 6”x8” glass blocks.  (I had a difficult time finding someplace that sold glass blocks individually, luckily the Lowe’s near me carries them.)  I also used a diamond drill bit (more on this later), (3) strands of 50 Christmas lights with white wire, (3) vinyl images (more on this later), felt pads (optional) and ribbon.

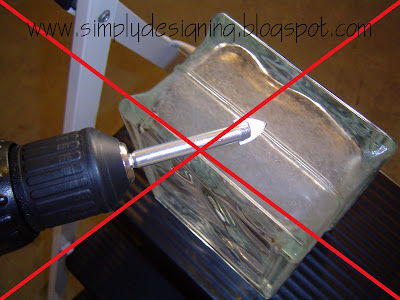
The first thing you will want to do is cut a hole in the bottom of each of your glass blocks.  The most important part here is purchasing the correct drill bit.  It needs to be a drill bit suitable for drilling glass.  There are only a couple of options available at most hardware stores.  Below is an image showing the first diamond drill bit that we purchased. Please note, this is not the correct drill bit!  I could only find this style in a ½” diameter size which we soon discovered was too small to put a strand of Christmas lights through.  So back to the hardware store we went to exchange it.

Drill+bit+that+didnt+work+copy Christmas Glass Blocks 28
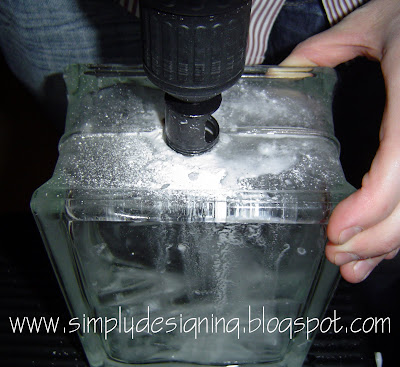
Below is the diamond drill bit you will need!  It is 1” in diameter and, unfortunately, 3x the price of the above one.  But if you want sparkly glass blocks, you will need to be able to drill a larger hole.  As a side note to this, we were told at Lowe’s that at Christmas time, sometimes, they carry pre-drilled glass blocks.  We could not find any, so we drilled our own.  Also, if you live close to us, we would be more than happy to help you with this.
Drill+bit+that+works+copy Christmas Glass Blocks 29
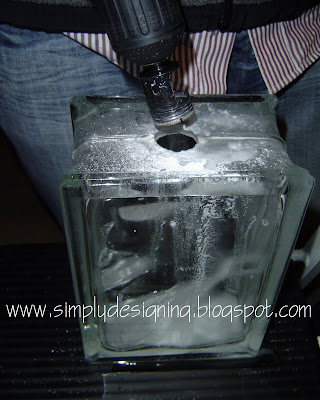
Be sure to follow the directions when drilling the holes.  Our drill bit directions told us to keep the area we were drilling moist with water while drilling.  I enlisted the help of my husband to assist me with drilling while I held the glass block in place.  This is easier with 2 sets of hands.
Glass+block+with+hole+copy Christmas Glass Blocks 30
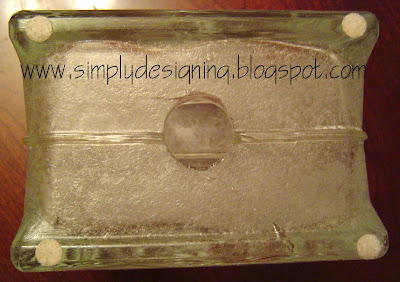
We added felt pads to the bottom of our blocks to help protect the surface we wanted to place them on.
Glass+block+hole+and+felt+pads+copy Christmas Glass Blocks 31
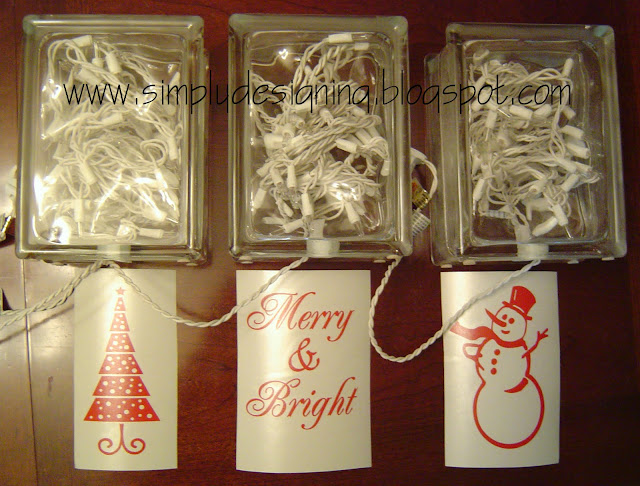
After the glass blocks are drilled, you will need to rinse out the insides of the blocks and let them dry.  After they are dry you can insert your Christmas lights inside.  I used white lights but feel free to use any color you want.
Glass+block+with+lights+copy Christmas Glass Blocks 32
Glass+blocks+with+lights+and+vinyl+copy Christmas Glass Blocks 33
Next I prepared the vinyl images.  NataLee helped me design and produce these vinyl images.  I like using vinyl because it is so easy to apply.  If you don’t want to order vinyl images or don’t have access to a vinyl cutter, you can always print or cut images yourself and apply them to the glass blocks using mod podge.  I would use a glossy finish mod podge if you go this route.
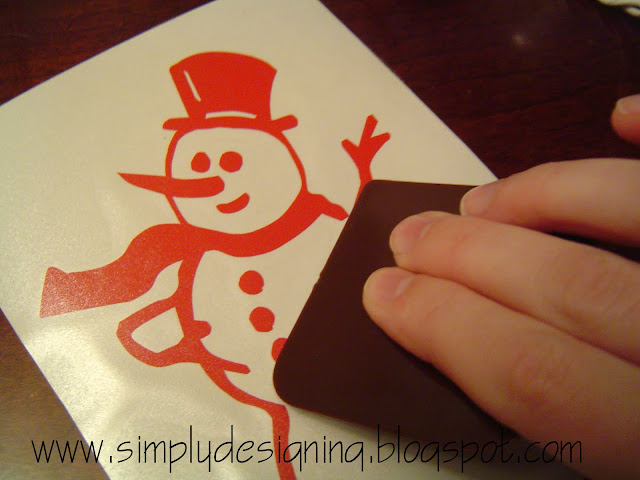
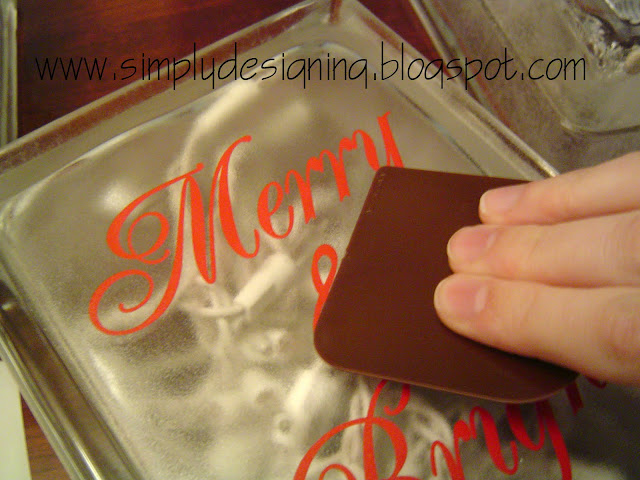
When I use vinyl I like to be sure the vinyl is secured to the top layer by rubbing the vinyl.  (Your fingers work fine for doing this, but I like using my pot scraper!)
Apply+vinyl+1+copy Christmas Glass Blocks 34
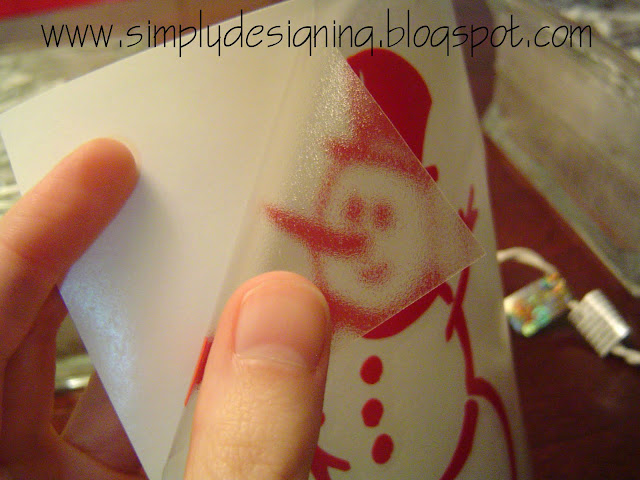
Then you carefully peel off the top layer from the bottom layer.  The vinyl image should stay on the top layer.
Apply+vinyl+2+copy Christmas Glass Blocks 35
Place the vinyl image on the glass block.  I like to stand above the vinyl so that I can be sure it is centered correctly.
Then, rub the vinyl onto the glass blocks being sure to secure it well.

Apply+vinyl+3+copy Christmas Glass Blocks 36
Carefully peel the application paper off of the glass block making sure that all the vinyl stays on the block.  Repeat for all (3) glass blocks.
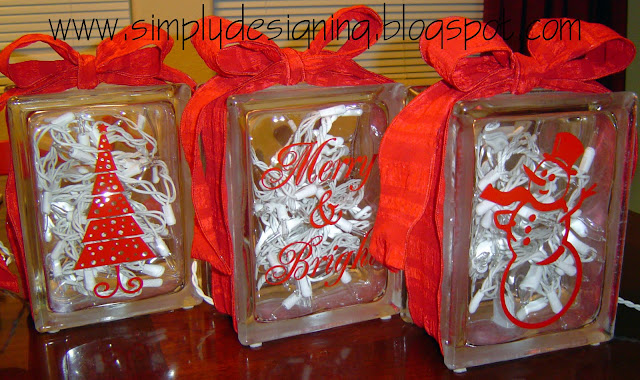
Tie ribbon around the glass block if you choose.  (I used 2” wide ribbon.)
Glass+blocks+Done+copy Christmas Glass Blocks 37
Turn on the lights in the glass blocks, turn off your house lights, and you have a beautiful, sparkly holiday decoration!
Glass+blocks+Done+Lights+on+copy Christmas Glass Blocks 27
If you like these, would you please take a moment to Pin It?
Ashley Signature 2 Christmas Glass Blocks 39
I would love for you to follow me on Facebook, Twitter, Google+, Pintrest and via email.
I participate in the link parties found here.

More Crafts

  • Salt Scrub Salt Body Scrub 08306 How to make a Salt Scrub 40
    How to make a Salt Scrub
  • Summer Hoop Wreath 06852 Summer Hoop Wreath 41
    Summer Hoop Wreath
  • How to make Farmhouse Christmas Ornaments 06055 How to make Farmhouse Christmas Ornaments 42
    How to make Farmhouse Christmas Ornaments
  • Peppermint Sugar Scrub 04668 Peppermint Sugar Scrub 43
    Peppermint Sugar Scrub

Reader Interactions

Comments

  1. designdazzle.blogspot.com

    December 08, 2009 at 2:20 am

    Great job!! Loving the red with the white. My mom gave me a set they made in homemaking. She used gold vinyl - it&#39;s pretty. Thanks for the tutorial : )<br />Toni

    Reply
  2. Cat

    January 17, 2010 at 11:46 pm

    I love how these look- what a great project!

    Reply
  3. Lisa

    January 18, 2010 at 11:41 am

    Those are SOOOO cute!!

    Reply
  4. Amy

    December 08, 2010 at 1:52 am

    Great idea! I love it!

    Reply
  5. Amy

    December 08, 2010 at 1:53 am

    Great idea! I love it!

    Reply
  6. Mary DuBois

    December 17, 2018 at 8:37 pm

    Where did you buy your drill bit and size did you us ?

    Reply
    • Ashley Phipps

      December 19, 2018 at 8:12 am

      Hi there! We just bought it at a hardware store. I believe we used 1"...but you just want to be sure it is big enough that you can get the lights into the glass! So you could make it smaller if you needed to I'm sure.

      Reply
  7. Lynda

    March 22, 2019 at 7:57 pm

    Where do I get the vinyl images?

    Reply
    • Ashley Phipps

      April 01, 2019 at 12:47 am

      Sadly, it looks like the shop I got them from is no longer open. I would search on etsy for something similar 🙂

      Reply
  8. Dawn G

    October 12, 2019 at 6:50 am

    I know...stupid question. When the hole is drilled, where the heck is the glass disk that you drilled out? Is it in the bit or the block? If it's in the block, how do you get it out? ????

    Reply
  9. Dawn G

    October 12, 2019 at 6:53 am

    I know...stupid question. After drilling the hole, where does the glass disk go? Is it in the bit or glass block? If in the block, how do you get it out?

    Reply
  10. Kerri

    December 04, 2019 at 11:09 am

    Where r u located ? I have several of these that I got free and would like to use them for a decoration at a church Christmas banquet.
    I have had more negative comments on getting the holes cut in my glass blocks than positive ones. I am afraid I will ruin more glass blocks than I actually end up with that can be used. Wouldn’t be a blessing if you were close to me and could help me get started. I am in Indiana...May be a long shot but still thought it worth asking.

    Reply
    • Ashley Phipps

      December 06, 2019 at 8:08 am

      Ah I really wish I could help. We just moved from Indiana this summer all the way to Washington state. 🙁 best of luck.

      Reply
  11. Katrina Gilley

    July 01, 2020 at 2:34 pm

    Beautiful piece of work love it x
    From the UK

    Reply

Leave a Reply Cancel reply

Your email address will not be published. Required fields are marked *

Primary Sidebar

Hello Friends!

Ashley Phipps Simply Designing I'm Ashley Phipps and I love sharing SIMPLE DIY, home, travel, food, craft and essential oil ideas with you! Learn more about me here. Contact me here. Find Media/PR info here. Privacy is important to us. Please read my Privacy Policy.
  • Email
  • Facebook
  • Instagram
  • Pinterest
  • Twitter
  • YouTube

Favorite Posts

Color-Blocked Easter Eggs Featured Image

Color Blocked Easter Eggs

Easy Easter Bunny Projects

Easy Easter Bunny Projects


COPYRIGHT: You’re welcome to link to Simply Designing or use a single image with a brief description to link back to any post. Republishing posts in their entirety is strictly prohibited.  Any use for commercial purposes is strictly prohibited. Feel free to pin on Pinterest. Find out more in my Privacy Policy.  Simply Designing with Ashley Phipps LLC is a participant in the Amazon Services LLC Associates Program, an affiliate advertising program designed to provide a means for sites to earn advertising fees by advertising and linking to Amazon.com . Simply Designing with Ashley Phipps LLC and it’s owner, employees and affiliates are not liable in any way for injury or loss (whether physical, emotional, monetary or any other kind of loss) resulting from any inspiration, ideas, directions or information gained from this website. We advise you to always follow manufacturer instructions, take appropriate safety precautions and hire a professional when in doubt. We love it when you use our site for inspiration, but by using it, you agree that you do so at your own risk.

Privacy Policy 

Copyright © 2023