• Skip to primary navigation
  • Skip to main content
  • Skip to primary sidebar

Simply Designing with Ashley

  • DIY
  • Oils
  • Recipes
  • Craft
  • Travel
  • Decor
  • Holiday
menu icon
go to homepage
  • DIY
  • Oils
  • Recipes
  • Craft
  • Travel
  • Decor
  • Holiday
search icon
Homepage link
  • DIY
  • Oils
  • Recipes
  • Craft
  • Travel
  • Decor
  • Holiday
×

Master Bathroom Remodel: Part 2 {Demo}

Published: Jun 10, 2014 · Modified: Mar 7, 2015 by Ashley Phipps · 552 words. · About 3 minutes to read this article. · 3 Comments · This post may contain affiliate links · This blog generates income via ads and sponsored posts · This blog uses cookies · See our privacy policy for more info Filed Under: DIY, Home Decor, Sponsored Post

Last week I shared our Master Bathroom remodel inspiration!  We are so thrilled to be able to take our master bathroom from builder blah to fabulous!  It is going to be a lot of work, but we are so excited for the end result.  So after we had a plan in place (check out our inspiration HERE) we began to demo our bathroom!  But I have to admit I had one HUGE fear...

Master Bathroom Before - this remodel is going to be amazing!  Here is what it looked like before!  | #bathroom #remodel #homeimprovement

As soon as the first piece of drywall came off, the realization that something could be lurking in the walls hit me!  Yikes!  I hoped and prayed that we didn't find any animal bones in our walls, or any living animals either.  Eek!  I was so worried that something would come scampering or slithering out of the walls!  I know it sounds crazy, but it is true.  I don't like animals in my walls.

Thankfully, the only thing we found in our walls was a used can of spray foam adhesive.  Whew!

Anyway...we thought about demo-ing our bathroom one area at a time to keep our bathroom as usable as possible, but unfortunately because of all that we are doing, we ended up demo-ing everything.

Which means all four of us are using the kids bathroom right now.  Yaaaaa.  But at least we recently spruced that space up so it is a very beautiful kids bathroom!  (Read all about our kids bathroom remodel HERE, HERE and HERE.)

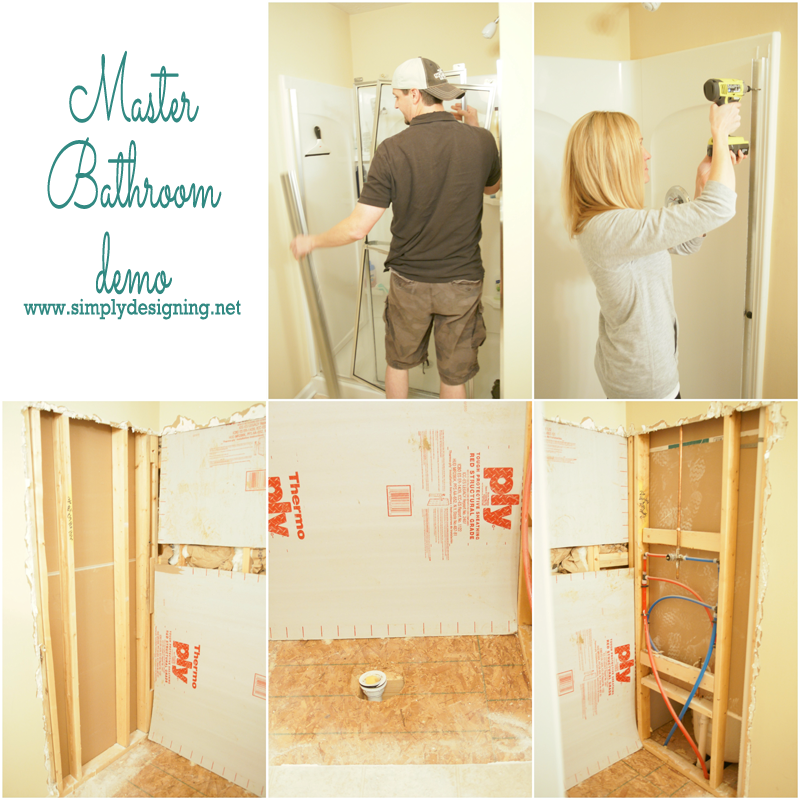
Our shower came out first: the entire fiberglass shower and the drywall around it and the ceiling too.  When the ceiling came down so did the blown-in insulation that we will later be replacing with new insulation.  It was such a mess.

Master Bathroom Demo - this remodel is going to be simply stunning!  | #bathroom #remodel #homeimprovement

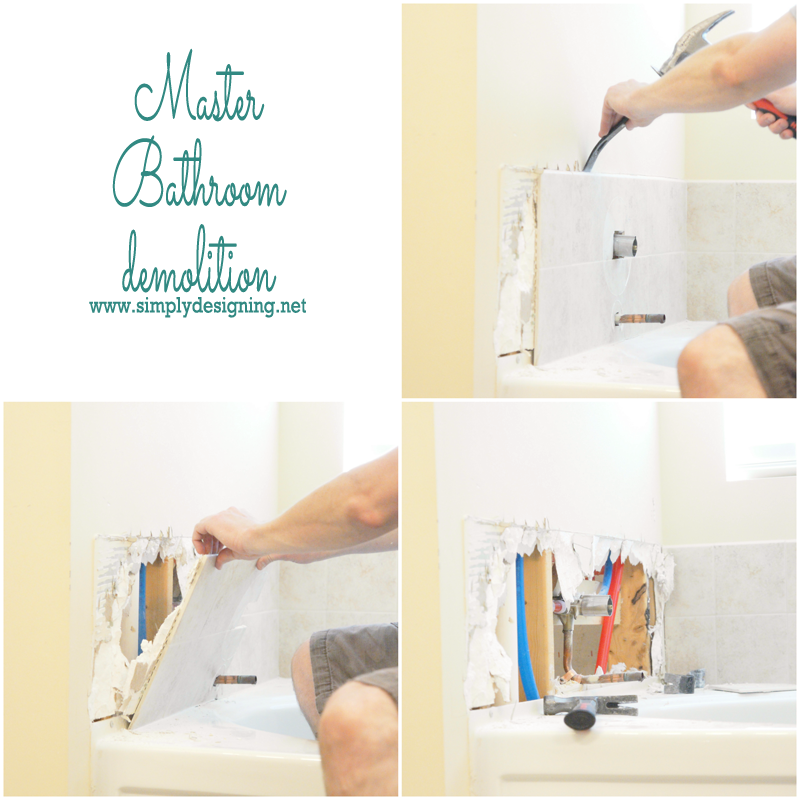
Then our toilet came up, our sinks and cabinets came out, our baseboards and flooring came up, and finally the tile around our bathtub was removed.

Master Bathroom Demo - this remodel is going to be simply stunning!  | #bathroom #remodel #homeimprovement

It was a lot of work and it was really dusty.  Please always use eye and ear protection when demo-ing.  Gloves are also a good idea.  And I also suggest wearing a mask as well so that you don't inhale any of the dust, especially when dealing with insulation. 🙁

So suit yourself up, grab a crowbar and hammer and have some fun demo-ing!

Check Out Our Master Bathroom Remodel Series:

Part 1:  Master Bathroom Inspiration

Part 2:  Master Bathroom Demo

Part 3:  Shower Remodel Prep

Part 4:  Building a Shower Pan

Part 5:  Tile the Shower

Part 6:  Installing Moen Posi-Temp® Shower Fixtures

Part 7:  How to Install Radiant Heated Tile Floors

Part 8:  Install New Tile Counter Tops

Part 9:  Install a Tile Accent Wall

How to Install a new Shower Door

How to Install new Bathroom Mirror Frames (in about 10 minutes!)

DIY Board and Batten

DIY Framed Mirror with Hidden Jewelry Organization

Please note that I am not a professional.  I am just sharing what worked for us.  As always please use all proper safety precautions and read and follow all manufacturer instructions.  Please note that I am not responsible in any way for any outcome if you try this yourself.  I am not liable for any injury or additional cost or expense incurred.  I always recommend consulting and hiring a professional if needed.  And always be sure to check with local building codes to obtain all permits needed for any DIY project.

More Home DIY

  • DIY Firewood Rack 09979 DIY Firewood Rack 1 firewood rack
    DIY Firewood Rack
  • How to make a Bat House 09477 How to make a Bat House 2 firewood rack
    How to make a Bat House
  • How to make an Address Sign 09259 How to make an Address Sign 3 firewood rack
    How to make an Address Sign
  • DIY Cat House 09103 DIY Cat House 4 firewood rack
    DIY Cat House

Reader Interactions

Comments

  1. Rather Square

    June 13, 2014 at 10:35 am

    I like seeing your demo process and inspiration for this bathroom! We&#39;re currently doing a &quot;budget&quot; reno on our main bathroom - not demo-ing anything, but just upgrading fixtures and painting walls. Looking forward to seeing what you do with this room next!<br />Laura @ rathersquare.com

    Reply
    • Ashley Phipps

      June 13, 2014 at 6:43 pm

      Thank you so much Laura! And it is always so amazing what a fresh coat of paint and new fixtures can do in a room! I bet it will look amazing!

      Reply
  2. Bobbie S

    June 17, 2014 at 12:39 pm

    Looks great!

    Reply

Leave a Reply Cancel reply

Your email address will not be published. Required fields are marked *

Primary Sidebar

Hello Friends!

Ashley Phipps Simply Designing I'm Ashley Phipps and I love sharing SIMPLE DIY, home, travel, food, craft and essential oil ideas with you! Learn more about me here. Contact me here. Find Media/PR info here. Privacy is important to us. Please read my Privacy Policy.
  • Email
  • Facebook
  • Instagram
  • Pinterest
  • Twitter
  • YouTube

Favorite Posts

DIY Foil Easter Eggs

DIY Foil Easter Eggs

Color-Blocked Easter Eggs Featured Image

Color Blocked Easter Eggs


COPYRIGHT: You’re welcome to link to Simply Designing or use a single image with a brief description to link back to any post. Republishing posts in their entirety is strictly prohibited.  Any use for commercial purposes is strictly prohibited. Feel free to pin on Pinterest. Find out more in my Privacy Policy.  Simply Designing with Ashley Phipps LLC is a participant in the Amazon Services LLC Associates Program, an affiliate advertising program designed to provide a means for sites to earn advertising fees by advertising and linking to Amazon.com . Simply Designing with Ashley Phipps LLC and it’s owner, employees and affiliates are not liable in any way for injury or loss (whether physical, emotional, monetary or any other kind of loss) resulting from any inspiration, ideas, directions or information gained from this website. We advise you to always follow manufacturer instructions, take appropriate safety precautions and hire a professional when in doubt. We love it when you use our site for inspiration, but by using it, you agree that you do so at your own risk.

Privacy Policy 

Copyright © 2023