If you missed Part 1, 2, 3, 4 or 5 of my Stair Case series, be sure to check them out here:
Staircase Make-Over {Part 2}: and it all went downhill
Staircase Make-Over {Part 3}: and the downhill spiral continues
Staircase Make-Over {Part 4}: are you kidding me!?!?
Staircase Make-Over {Part 5} this was our final attempt...no matter what!
We were so thrilled when our stairs actually started to come together.
This was truly a labor of love. And patience. A
nd an acceptance of a life-time of living in a sawdust-coated house.
But mostly, it was a big huge learning experience for us!
As soon as the stairs were (finally) properly stained with two coats of stain, we were ready to finish this project up! (As a note, we had our stain custom mixed to match our railings, which match our kitchen cabinets as well.)
The finishing touches of this project were quite simple.
1. We applied 3 coats of Minwax Fast-Drying Polyurethane Superior Durability, Clear Semi-Gloss (affiliate link) to our stair treads using a Foam Brush. Be sure to let the poly dry completely in-between coats. We applied 3 coats of poly because we knew these stairs would get so much traffic that we wanted to be sure they were well protected to prevent excess wear and tear on the steps.
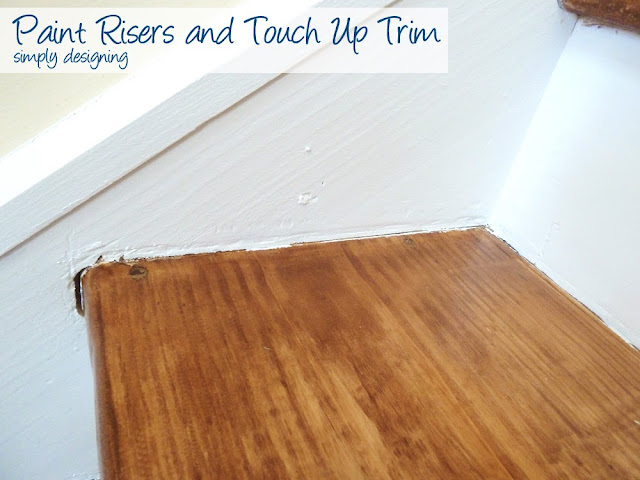
2. We carefully taped off our stairs and painted (using the same semi-gloss paint that all of our house molding is painted in) the risers of our stairs.
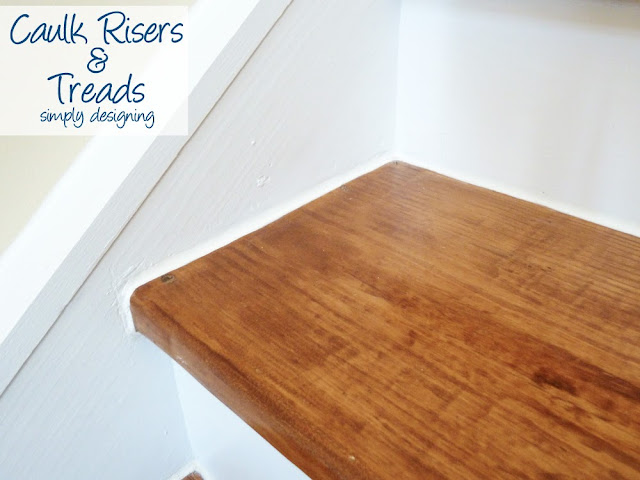
3. The final finishing step to this process is to go back and caulk all around the stairs. Caulking truly gives a project like this a finished, professional look to it and is a necessary step if you want to be sure your stairs look nice.
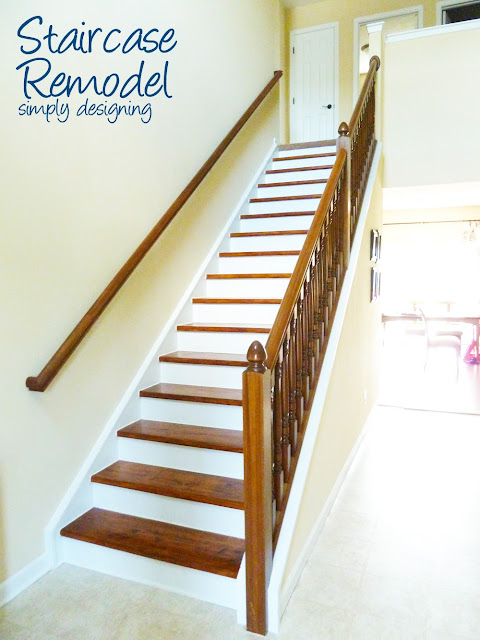
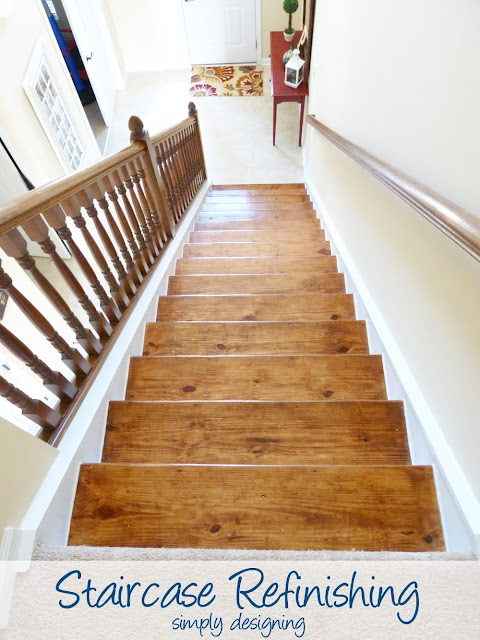
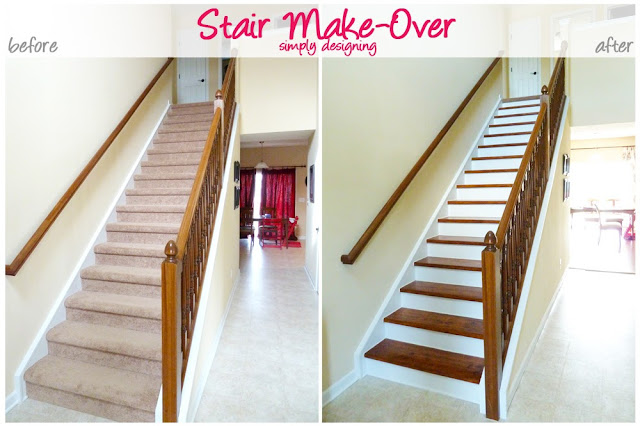
After all that work...all that sanding and staining...we fell in love with the final results!
Maybe it is because we put so much blood, sweat and tears into this project that we love them so much, but we really do truly love our stairs!
And surprisingly, they are not slippery!
Much fewer slips and falls happen on our wood stairs than happened on our carpet stairs.
So our stairs are safer and honestly, I think they look SO much nicer!
When you walk into the front door of our home, you see our large staircase and now, instead of a cheaply carpeted staircase, you see a beautiful, wooden staircase!
Isn't the transformation amazing!?
Have you ever tackled a project like this?
You can read the whole Staircase Make-Over Series here:
Staircase Make-Over {Part 1}: the prep
Staircase Make-Over {Part 2}: and it all went downhill
Staircase Make-Over {Part 3}: the downhill spiral continues
Staircase Make-Over {Part 4}: are you kidding me!?!?
Staircase Make-Over {Part 5}: this was our final attempt...no matter what!
Staircase Make-Over {Part 6}: the finishing touches
I would love for you to follow me on Facebook, Twitter, Google+, Pintrest and via email.
I participate in the link parties found here.





Christine
Very nice!!! Want to come and do mine? 🙂
Ashley Phipps
Thank you so much Christine! <br /><br />You are so sweet! I totally wish I could come and help!!! That would be way too much fun 🙂
Laura
For the caulking, did you use a special brand or process?
Ashley Phipps
No. Nothing special! We just used regular white caulk. Spread it on and used a finger to wipe it all so it looks nice! A wet paper towel can be helpful too!
Beth
Your steps look awesome! We have the same kind of wood under our carpeted steps, so now I'm really tempted to rip it up and stain. We have 3 kids and a dog...has it been pretty durable for you so far?
Ashley Phipps
Thank you so much Beth!! <br /><br />You should totally rip up the wood and stain it!!!!<br /><br />And yes, our stairs have been incredibly durable! My son (3) throws things down it all the time and we don't notice any damage to it at all!! So we love them!<br />
Meg Grabner
Your steps look fantastic! Such informative posts, thank you for sharing! Crossing my fingers I can get lucky and have nice wood under my nasty carpet too!
Ashley Phipps
Thank you Meg! I am crossing my fingers for you!
Chrissy
How long after finishing things up were you able to walk on the stairs? I'm considering doing this at our house, but all our bedrooms are upstairs!<br />
Ashley Phipps
Yes, all of our bedrooms are upstairs too! We let each coat of poly dry overnight (because we were doing it at night after the kids were in bed), but check the back of your can to be sure on dry times! BUT, we also only did every other step at a time. So we could always get up the stairs 🙂
colette murphey
Love the color...what brand of stain and where did you get it? Home depot?. You said you custom made would love to know the numbers<br />
Rose marie
Just found your excellent post. We have ripped up carpet on our stairs and have found pine as well. We are having a difficult time finding the right color stain. Other rooms are natural red oak. Your color looks great. Would you please share what stain and color(s) that you used. Thanks.
Krista kolb
Did either of you ladies find places that mix custom stain, I have been looking with no luck
Ashley Phipps
Usually you can get any paint / stain store to custom mix stain for you.
Therese
Thank you for sharing! Sometimes "what not to do" is way more helpful than seeing a smooth easy process where nothing goes wrong... because something almost always goes wrong! 🙂 <br /><br />AND thank you for showing your stairs before caulking! We moved into a home where all the trim needs a fresh coat of paint and to be re-caulked. I wasn't so sure if the caulking would make a
Ashley Phipps
Thanks Therese! I am glad it was helpful! And yes! Caulking definitely makes a big difference! I am so glad it could help!!
Cecilie
I just tore up the (worse-than-your's) carpet & refinished one of two staircases having read through all of the steps you've shared here beforehand. The caulking is a great idea but in addition to the reason you give, I just want to add it also eliminated the squeaking we had before. No more squeaky stairs!
Ashley Phipps
Way to go Cecilie!! I am so glad my tutorial helped you guys re-do your stairs!! And I am so glad the caulk helped the squeaking!! Wahoo!
7d44bae2-bec0-11e3-a47e-000bcdcb8a73
LOL I am also getting ready to rip up my carpeted stairs and have a go at staining them. I have to give you and your hubby credit for hanging in there as long as you did! I have been sanding, staining and refinishing things for years and had to laugh just remembering all of my trials and errors. GREAT JOB!
Carol Rask
WOW! You two should win some sort of PEACE PRIZE! I probably would have had to wait a while before tackling that third coat....... I take my hat off to you's. GREAT JOB!!!!!!! And it looks so beautiful. You certainly helped alot of us. Thank you... : )
Deana Blevins
We are getting ready to stain our stairs after they had to be reworked. The previous owners had a wretched 90 degree angle that was dangerous. He replaced all the treads and rises so I will have new wood to work with but there will still be nail holes to fill and minimal sanding but these blogs hopefully will help me eliminate some mistakes since staining is my job after my hubs was so kind to
Erika Dotson
Oh my goodness you have NO idea how thankful I am that you made this into several posts!!!! We completely added stairs to our house and I confidently said of yea I can do all the finishing work for them!!!! I have so many different shades, and finishes on my stairs (all from the same stain) you wouldn't believe it! I have been so fed up with them that I honestly have just given up on them in their sloppy state!!!!! Thankfully now I can see we have hope for our stairs!!!! Now off to find a belt sander as I am about at the same step you were at round 2!!!!!!!
Ashley Phipps
Oh I am so glad this helped!! Good luck with your stairs! I know they will turn out great 🙂
Tanya
Thank you so much for your advice on how to do this. Despite all your woes, your stairs look marvelous and professionally done. I'm certain your recap has helped many of us DIY'ers bypass some major pitfalls. I can only hope that my project turns out the same!
Mary
Your stairs look beautiful! I have worked with Pine before and love it! But it takes stain unevenly, so I have one tip to help. Pre Stain before staining. it is a clear coat that is applied before the actual stain is applied. Then the stain absorbs evenly.
Catherine
This has been so helpful. We are going to paint and stain our stairway to the lower level of our home. Didn't know which to do first, paint or stain. I know it took plenty of mistakes to get it right but your stairway is beautiful! Thanks for sharing!
Ashley Phipps
Oh thank you so much Catherine!! I would definitely stain first! Because you can paint over stain, but you can't stain over paint 🙂
Laurie
We are actually rebuilding our stairway; walls, treads, risers, handrail, newell post, the works. Also all the floors in the places, so all my wood has to be stained to match. I learned long ago not to allow my hubby to stain anything. I'm the painter and the stainer in the family. We've used wide red oak for our floors, so I have red oak for the treads, scraps from the floor for the risers and I'm buying a red oak hand rail and newell post, so it will be easy to keep everything looking the same. The balusters will be painted white, so I hope all will look as good as yours when I'm finished.
Ashley Phipps
It sounds like it will be beautiful Laurie!!
Toni
Wow! Your steps look amazing! I have wanted hardwood steps for years & after several messes by the new puppy my hubby finally said to call and get an estimate. They are coming next week to give me a price. In the meantime I have stumbled upon your tutorial & now I'm wondering if I should tackle the project myself. However, I also want to include the top of the steps & upstairs hallway. Am I crazy to take on such a huge project?
Ashley Phipps
Toni!! You can totally do it yourself if you have the time and patience! (And learn from all of my mistakes too of course 🙂 🙂 But either way you go I know they will look amazing!!! We love wood stairs! Hugs!
Bridget
Thank you for taking the time to write out your entire experience! We took our rugs off last week, spent two LONG days removing 100's of staples ( I'm actually still removing them). Today I finally started with the belt sander, some stripping, and a palm sander. Very happy that I found your post, and hopefully can avoid some mistakes I see I was already heading towards. Your steps are quite beautiful, great job!!
Ashley Phipps
Oh I am so glad that my post is helpful to you!! Good luck with your project! I am sure it will turn out amazing!
Wendy
I am about to do a staircase makeover myself in the near future. I HATE to sand. Wonder if there's some type of poly stripper on the market that will make the process a lot easier? I want to apply a darker stain instead of the natural oak that I have on my steps now.
Jamie Graham
Wow they look amazing you guys did a great job!!! Really impressed with how closely matched you got the treads to the railing. I am currently doing the same to my stairs... Just a staining tip... Mix a little bit of varsol in the Minwax stain! This will allow the stain to go on smoother and more evenly and will dramatically reduce the effect cross-grain sanding and foreign oils would have on the stain soak. This might save you from extra time and stress on your next staining project 🙂 Also it allows you to be messier it really gives the stain much more forgiveness!!!
Lori Plans
How much varsol do you mix in?
Jill Drake
simply Amazzzzzzzzing.......stunningly beautiful........I have mine to do, so think of me lol....thanks so much for your wealth of knowledge,this has made it all make sense to me now......I can't wait to begin, I have learnt soooo much from you.....
Hope
I am so happy to have stumbled across your tutorial on Pinterest! I have researched and researched and talked about this for years! We finally took the plunge last weekend and ripped the carpet off of our stairs. It has taken a week to remove staples and paint over spray left by the builders and I am hoping to start the staining process tomorrow! Thank you for being so detailed in your description of the process and mistakes. This has been the most informative description of the process I have come across. Great job!
Joyce Lewis
Love this post...all of them! Your stairs look absolutely stunning!!! We are renovating a 100 year old home and right now I am tackling the stairs. I am doing something very similar but a much darker stain with white trim. It is most certainly a true labor of love. Wish me luck...haha
Angel
Thank you so much for posting this. I plan to do this with ours and would probable done the same mistakes.
The end result is fantastic and I salute you for your patients and perseverance.
Chandler
My Fiance and I are in the long (by long I mean year) process of doing our stairs. We have a old house that has angled stairs in some areas which made them so hard to sand. On top of that, the previous owner painted the treads dark blue and risers white...took me forever to sand. My fiance finally got to the staining of them last night to only find out he mixed the wrong two staines together (bought from lowes to match the upstairs laminate). Prior to this we punched protruding nails down in the treads and put wood putty over the holes. He put too much wood putty!! So we had to re sand (hopefully they are stianable and dont stick out!) . So at home now we have three stairs that need to be re sanded to get the wrong stain put ???? . I also noticed scratch marks from my corner sander so I will need to to a full sand again with 120 grit or finner sand paper. Any thoughts on if the wood putty will look gold after sanding some more and staining? My fiance has given up and is ready to paint the stairs!???? looks like this project is all mine now! Would it be best to use a wood conditioner before staining?
Ashley Phipps
Wow! What a project you have undertaken! I am sure it will be so wonderful when it is all done!
If the putty you used is stainable, it will take the color of the stain. But the texture will be different because you won't see the grain. If you sand it down really well it should look just fine!
And yes I would recommend using a wood conditioner first!
Best of luck!!
G Rodriguez
It is truly a labor of love!!! And what spectacular results you have! I am currently in the same undertaking and it is taking a lot of time and energy. I am having a dillema with my stringers which was covered with layers of paint together with the risers, splatters of paint on the stained treads when I took the carpet off. After tedious and labor intensive stripping of both risers and treads I slightly damaged and scuffed the stringers with the stripping agent. I don't want to completely strip the stringers, is there anyway that I can just clean or polish it up to be painted? How did you paint the stringers, I noticed some stain got on them but you got it all fixed and fabulous. Hope you can find time to reply. Thanks!
Ashley Phipps
Yes you can just paint over them. Paint goes over stain. I would just lightly sand them and then paint them and they should be just fine!
adam
after reading the first page of this project, the pitfalls!, the blunders!, and reading through the pages to see the further pitfalls and remedies, I can take another look at my super dark stairs just like yours and know what I have ahead of me, and know you have just saved me a whole load of jobs. Unlike yourselves, I can pull up my stairs fairly easy as they are only nailed in topside and open on one side (not fixed both ends), So, with any luck I can take them off, take them OUTSIDE! to sand at the very least, or to a local wood shop, and get them to belt sand all the stain off in the direction of the grain. I really appreciate your Blog and congratulate you on the fabulous stairs.
adam
actually, my stairs do not lift up so easily, I will be following the exact same path with a belt sander, hey ho, onwards and lesson learned.
Rick Kilpatrick
We are planning the same job, although we have more paint on ours than you did. Since it has been several years since you have posted this is there is there any further advice as to anything that you would have done differently with finishing?
Ashley Phipps
Not really! We are still loving out stairs!
Max
Firstly what a great informative post! I wish I had found your blog before I attempted my own stairs! Unfortunately I stained my beautifully sanded stairs far too dark (applied stain rather liberally) and now am at the ‘sand all stain off’ stage. It really is soul destroying!
The bulk of the stain is off but I am having difficultly getting the colour out of the edges and corners where the stain has really permeated the wood. Even my triangular mouse sander isn’t cutting it!
I wondered before you went for attempt number 2 did you remove every last speck from the corners or was some still visible before you re-stained? Yours have come up wonderfully so if I can’t get mine anywhere close to yours I’ll be happy!
Tanya
What sander did you use? Is there one you recommend? I know there are some that help with the sawdust.
Thanks!
Jeff
What purpose does the caulk serve? You reference in the post the aesthetic reasons, and another commenter references the reduction of squeaking. Are there other reasons, this is a new concept to me. And in white, it would seem like that white caulk would get particularly dingy.
Ashley Phipps
If you do not use caulk, you will see every tiny imperfection in the wood not lining up perfectly. So it is a big deal for aesthetics if your wood isn’t perfectly cut like ours wasn’t. It also seals the gaps, and helps so that dirt doesn’t get trapped in the gaps. Yes you will need to wipe down your stairs once in a while to keep them looking clean. But you’d need to do that anyway.
Sharon Miller
Hi! I'm doing the same thing to my stairs. We ripped out all the stained carpet, and I'm painting the vertical boards and staining the steps with a dark stain. It seems to be taking forever, I really like the way it's turning out. The challenge is keeping the granddaughter and the dogs off the steps on Stain Day. It really is necessary to stain every other step, then switch when the stain is dry. I didn't know about the caulking, so thanks for that tip!
Jaymie W
Hi, I just came across this post and we will be refinishing our stairs soon. For the risers, did you paint them white or buy already painted riser overlays?
Ashley Phipps
We painted them white.
Edna
Love your stairs. Did you sand between each coat of poly?
Ashley Phipps
It is always best to follow the instructions regarding application that is on the can of stain or poly! Some finishes are different than others so I always revert to what the manufacture says. Good luck!