I love my Swifter Duster! It is what I use 98% of the time for all my dusting needs.
But I don't love the constant expense of having to buy the replacement dusters. It really adds up.
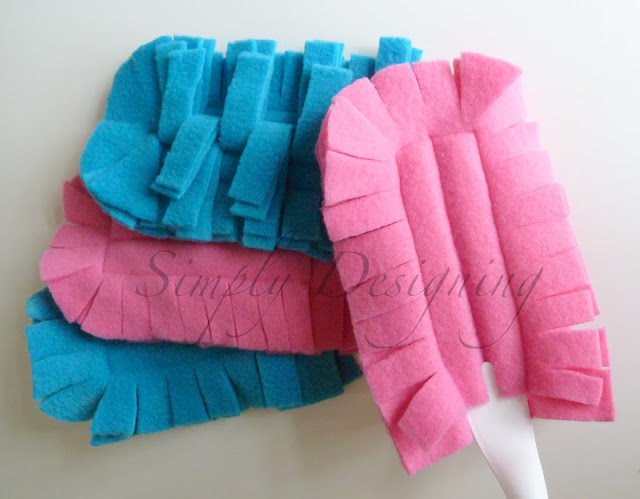
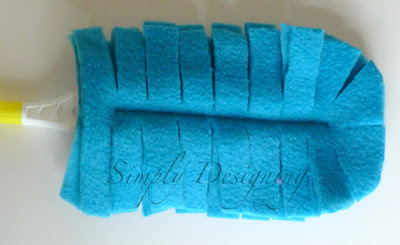
So I came up with a solution! Reusable, Washable Swifter Covers!!
Confession time. I don't really sew so I wasn't thrilled about pulling out my sewing machine. However, these ended up being really easy once I figured it all out.
So I am going to give you the simple how-to so that you don't make the same mistakes I did 🙂
You Will Need:
- Fleece, anti-pill preferred
- Most fleece comes 60" wide. Each duster will be 4.5"w x 7"t and have four layers. So with a strip of fleece 60" wide and 5" across you can make 2 dusters!
- Thread
- Fabric scissors
- Sewing machine
How to:
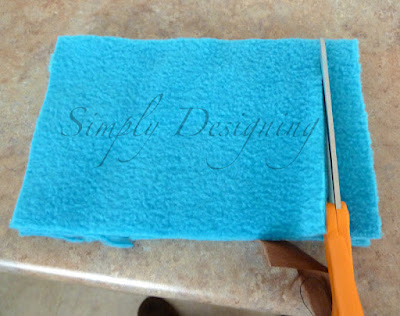
First you will want to cut your fleece 4.5"w x 7"t. You will need four pieces this size per duster.
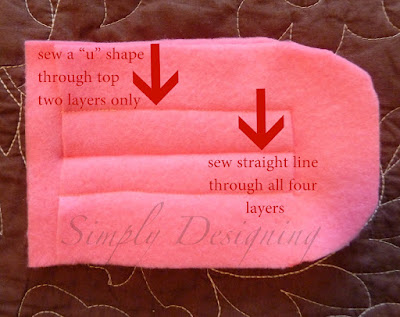
Take what will be your top layer and cut about ¾" off of the bottom of this layer only.
Take your top two layers (including the shorter layer you just cut) and sew a squared "U" shape in the middle. This "U" shape should be about 1 ¾" wide and 4 ¾" long from the bottom of the short layer. These become the top two layers of your duster.
Layer two more fleece pieces underneath these top two layers and sew a line down the center of the fleece from the bottom of the short layer until the top of the "U".
If you like, you can round the corners of the duster at this point.
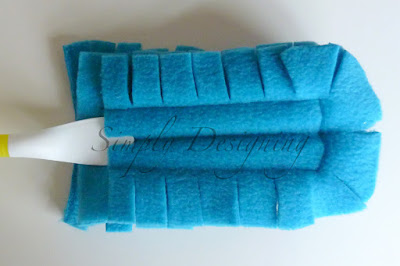
Next you will need to take a sharp pair of fabric scissors and cut your fringes.
Trim your top two layers close to the "U" being careful not to cut your stitch.
Trim the bottom two layers close to the straight line being careful not to cut any stitching.
That's it!! Pretty simple!
But they real test was in the usage of it. I admit I was a little skeptical. I know, I know. I made these but still wasn't sure how well they would work. So here is my 100% honest opinion.
They work better then the disposable Swifter Dusters. BETTER! Seriously!!
There was dust that didn't come off my baseboards the last time I dusted them with my disposable dusters and when I swiped my Reusable Swifter Duster over my baseboards, it cleaned the dust right off! I was pretty impressed.
I am actually sad that I have half a Costco-sized box of disposable dusters I still need to use because I think these fleece Reusable Dusters are even better!
When one gets pretty used, I can just toss it in the wash!
I made 4 dusters for less then $2!!! And since they are reusable so I am saving a ton of money! (And this is a better alternative for the environment as well.)
These would also make a great house-warming gift.
How great is that!?
I participate in the link parties found here.
Subscribe to Simply Designing by Email





NanaDiana
What a great idea, Ashley! And a good money saver, too. xo Diana
joen
WOW - Thanks! I only have two duster replacements left and I was dreading the expense. I know I have plenty of fleece up in my sewing room and I will be putting to use on this project.
Colleen
Awesome! Love this idea. Thank You<br />ColleenB.
Ashley Phipps
Thank you Colleen!
Jenn @ Clean and Scentsible
Great idea! Pinned!<br />
Ashley Phipps
Oh thanks so much Jenn! And thanks for pinning!
Aisling Beatha
Genius. Now I just need to remember what I did with the handles I have for these things.
Ashley Phipps
🙂 Thanks so much!
Nikii
Cute idea. Wonder if fleece would org on the floor too?
Kay Gibson
I made one tonight but will have to adjust the measurements for the U - unfortunately I don't have any of the old handles with the nub that holds the duster in place. But other than that minor glitch - works great!!!!
Ashley Phipps
Oh goodness yes I can see how that would be a problem!! I clearly keep my duster handles too long! I didn't even know they made a new style hahaha!
Samantha Stambaugh
Fantastic idea! Going to be making some for myself and family members in the new year. Keep these great ideas coming. Love the blog, too!
Ashley Phipps
Thanks so much Samantha!
Leslie smitna
How often do you throw them in the washer to wash
Kara
I'd love to know this too!
Ella
When they get dirty.
Ashley Phipps
I usually wash them after I am done dusting my home, so once a week or so. But if they aren't very dirty you might be able to go longer between washes!
kiki57
merci pour ce tuto bien utile
Ashley Phipps
You are welcome!
Ella
Unfortunately this was a fail for me. It did not collect the dust on my ceiling fans, it just pushed it off into the air. After cleaning three of my fans there was almost no dust on the cloth. I pulled out a swiffer cloth and used it on the two other ceiling fans and it worked perfectly to collect the dust, not disperse it into the room. Oh well, it was worth a try.
Ashley Phipps
I am very sorry that this wasn't a success for you. Have you tried washing the fleece? That may help it catch dust better. 🙂
Susan Raymond
Thanks much for the tutorial! I've been looking for something just like this.
Stephanie K Molsbee
Could you clarify the dimensions of the fabric? I understand the 60" but confused by what you mean width of 5 inches.
Ashley Phipps
Sure thing! If you go to the store and buy fleece that comes as 60" wide, and you only buy a 5" long piece of it, you can create 2 dusters from that amount of fabric. So you would leave the fabric store with a 60" x 5" piece of fabric.
If you want 4 dusters, ask for 10" of the 60" wide fleece fabric. You will leave the fabric store with a 60" x 10" piece of fabric.
I hope that makes more sense!
Janis Bowman
What a great idea to use up all the fleece small size yardage I have left over from other projects I have made in the past. Will be fun to miss match colors to make ones for grandchildren that go with the color schemes I used for their gifts last Christmas.
Thanks for the great idea and instructions. Great job.
Wendy
I made one of your fleece dusters today. I am impressed with how well it works! You’re right; it’s better than the disposable ones. Thank you!
Ashley Phipps
Yay! I am so glad you love them as much as I do!