It is no secret that I love Oreos.
I have been known to eat and entire box of Oreos by myself. I have been known to make them into Frosted Oreo Brownies, Truffles (aka Oreo Cookie Balls), Oreo Bark and even into Bunny Pops.
And. I also love Wilton products! In another life (aka approximately 4 years ago) I actually took all of the cake decorating classes Wilton offers! I loved them!
Throughout those classes and ever since then, I discovered how many fabulous products Wilton offers! I own so many Wilton things! I am especially impressed with their extensive variety of sprinkles (we love us some sprinkles in our house!), the amazing colors of candy melts they have, their wonderful icing tips, and really, just their genius in creating wonderful, affordable, high quality products that are simple and amazing to use!
So, combining my two loves of Wilton and Oreos 🙂 I wanted to show you a simple, delicious treat just in time for your Easter celebrations!
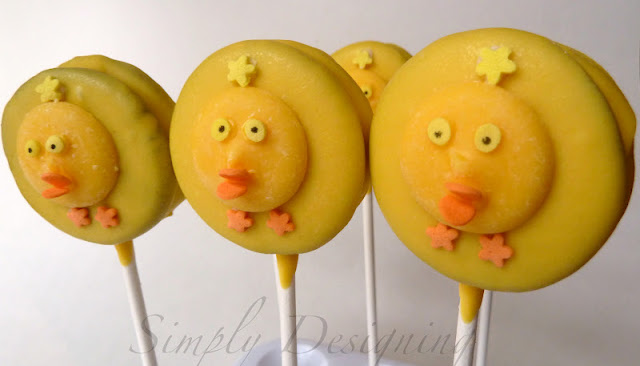
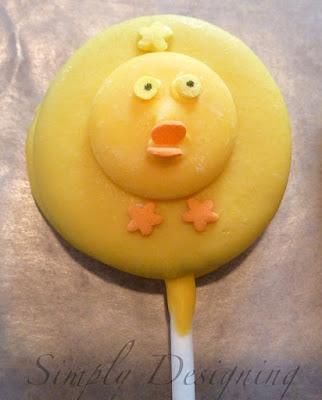
Today I am going to show you how to make really cute Spring Chick Oreo Pops!
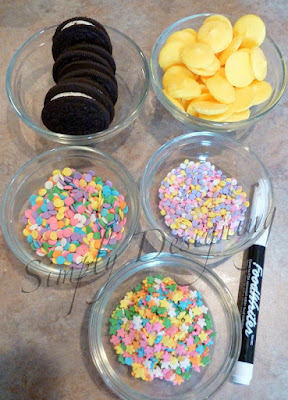
To make these you will need:
- Oreos (double stuffed are best)
- Wilton brand Candy Melts in Yellow
- Pop sticks (I used Wilton brand)
- Wilton Confetti Sprinkles, orange (available in their Flowerful Medley Sprinkle Mix)
- Wilton Daisies Sprinkles, yellow and orange (available in their Flowerful Medley Sprinkle Mix)
- Mini Confetti Sprinkles (yellow) (regular confetti sprinkles will work too)
- Wilton FoodWriter Edible Colored Marker, black
First, you will want to melt your Candy Melts. There are several ways to do this and I have gone into great detail here. However, let me tell you that Wilton Brand Chocolate Candy Melts are A.MAZ.ING! It is so much easier to melt candy melts then it is to melt regular chocolate.
And as long as I remember to heat these at 50% power in my microwave for 10-20 seconds at a time, stirring in between, these always melt into a perfectly smooth, amazingly wonderful texture for dipping. I choose to use Wilton Candy Melts whenever possible because they are just so easy to work with and really are fairly fail-proof! Seriously.
Next, go ahead and twist those Oreos apart just like you did last week when you were a kid.
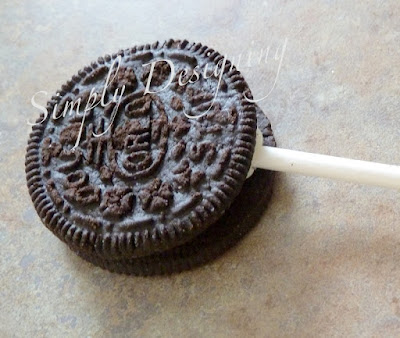
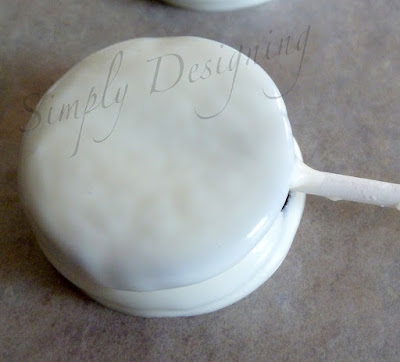
Dip one end of a pop stick into the melted chocolate and carefully press into the filling. (I forgot to take a photo when I did this with my yellow melted chocolate, so pretend the white melting chocolate is really yellow.)
The filling will crack. Don't worry, it's ok.
Just press the filling together a bit and put the Oreo back together.
Let the chocolate set for a couple minutes before proceeding.
Then, you will dip the entire Oreo into your yellow melting chocolate (again, let's just pretend this chocolate is really yellow...I was doing two projects at once and forgot to snap enough photos as I was working!)
While your chocolate covered yellow Oreo pops are drying, let's go ahead and assemble the Chick face!
For each face, you will need (1) yellow candy melt, (2) orange confetti sprinkles, (2) yellow mini confetti sprinkles (regular would work too), the black FoodWriter pen, melted chocolate and a toothpick.
Lay your candy melt down on waxed paper and using a bit of melted chocolate on a toothpick, place a small dab of chocolate where you will place your eyes and a little larger dab of chocolate where your beak will go.
Working quickly, place (2) confetti sprinkles in yellow down for the eyes, and then use (2) orange confetti sprinkles for the beak as shown in the photo below.
Using your black FoodWriter, place two dots for the eyes on the yellow confetti sprinkles.
Let your chick faces set.
After your Oreo Pops and your Chick Faces are set, you can take a bit more chocolate and adhere the face to the Oreo.
Then grab (2) orange Daisy sprinkles and (1) yellow Daisy sprinkle and attach (using chocolate on a toothpick) to your Oreo for the Chick's feet and tuft on top of it's head.

(this idea was inspired by this post here and by Wilton's amazing products!)
I participate in the link parties found here.
Subscribe to Simply Designing by Email






Cozyflier
These are REALLY cute. This would also be great for edible art day, our middle school has the kids do this every year and I'm always looking for things the kids can do! 🙂 Thanks!
NanaDiana
Ashley - THESE are SOOOO cute. I just love them. I hope to get a chance to make some with my grandkids before Easter. Thanks! xo Diana
Dorothy @ Crazy for Crust
These guys are super adorable! Love them.
Brian, Michelle, Teagan and Isla
These are so cute and my toddler loves them! I definitely want to make these for spring! Thanks for linking them up on my linky party last week. I so hope you will join us for the party going on now at Teagan's Travels!<br /><br />http://teaganstravels.blogspot.com/2012/04/destination-inspiration-linky-party-10.html<br /><br />Thanks, Michelle@ Teagan's Travels