• Skip to primary navigation
  • Skip to main content
  • Skip to primary sidebar

Simply Designing with Ashley

  • DIY
  • Oils
  • Recipes
  • Craft
  • Travel
  • Decor
  • Holiday
menu icon
go to homepage
  • DIY
  • Oils
  • Recipes
  • Craft
  • Travel
  • Decor
  • Holiday
search icon
Homepage link
  • DIY
  • Oils
  • Recipes
  • Craft
  • Travel
  • Decor
  • Holiday
×

Tissue Paper and Yarn Heart

Published: Feb 9, 2011 by Ashley Phipps · 383 words. · About 2 minutes to read this article. · 5 Comments · This post may contain affiliate links · This blog generates income via ads and sponsored posts · This blog uses cookies · See our privacy policy for more info Filed Under: Craft, Holiday

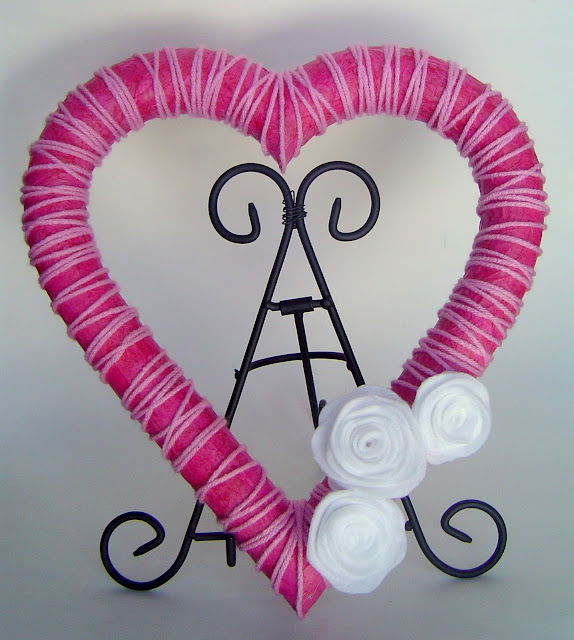
Heart+Final | Tissue Paper and Yarn Heart | 9 |
**This was one of the projects I brought with me to my Fox News segment the other day but hadn't shown on my blog yet.**
My idea for this project was inspired by these tissue paper and yarn Christmas trees.  I loved those trees the minute I saw them.  So as I was contemplating what projects to do for Valentine's Day, I decided to use a similar method to make a heart! 
And I just LOVE how it turned out! 
Did I mention that it is super easy!?
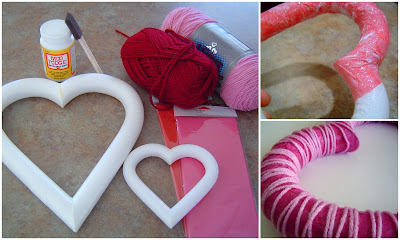
You will need:
  • Styrofoam heart form, any size
  • Modpodge
  • Foam paint brush
  • Yarn
  • Tissue paper
  • Hot glue gun
  • Felt
 Heart+Collage | Tissue Paper and Yarn Heart | 10 |
  1. Rip tissue paper into small pieces.
  2. Use modpodge to glue tissue paper pieces onto the foam heart form.  (Hint: I just placed the tissue paper on the heart form and, using my foam brush, painted the modpodge ontop of the tissue paper.  It will saturate the tissue paper and glue it to the form and give the tissue paper a protective layer on top all in one step!)
  3. Let first layer of tissue paper dry.
  4. Following step 2, add a second layer of tissue paper to the heart form.
  5. Let dry.
  6. Randomly adhere yarn on top of the heart.  You can do this two ways: a) dip pieces of yarn in the modpodge, completely coating the yarn, and wrap the yarn around the heart.  b) randomly wrap yarn around the heart and use hot glue to adhere the ends.  I did option b because I knew it would dry quicker and because I really didn't want to get my hands messy.  Lame but true 🙂 
At that point, I loved my heart, but I knew I needed to add just one more fun touch to it.  So I tried my hand at these awesome felt flowers!
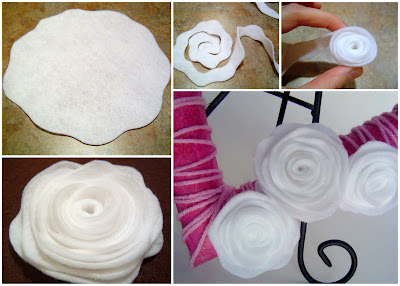
Flower+Collage | Tissue Paper and Yarn Heart | 11 |
  1. Cut a large circle out of felt and make the edges wavy.
  2. Starting at an outside edge, cut a spiral out of the circle using a wavy cut.  Leave a small circle in the center uncut.
  3. Starting at the outside end, roll the felt until a rosette is formed.  Continue to roll until the entire piece is rolled. 
  4. Hot glue the small circle to the bottom of the flower to keep the flower together. 
  5. I made three in varying sizes and hot glued them to my heart wreath!
Heart+Final | Tissue Paper and Yarn Heart | 12 |
I just LOVE how this turned out!

I participate in the link parties found here.

Subscribe to Simply Designing by Email

More Crafts

  • looking from the top down on a body scrub made with salt with greenery on the top of the photo and a wood lid to the right
    How to make a Salt Scrub
  • greenery hoop wreath with lavender and burlap bow
    Summer Hoop Wreath
  • DIY farmhouse christmas ornaments
    How to make Farmhouse Christmas Ornaments
  • Peppermint Sugar Scrub in a glass jar with red and white twine around the jar
    Peppermint Sugar Scrub

Reader Interactions

Comments

  1. WobiSobi

    February 09, 2011 at 7:10 am

    I saw this on the fox show you did. Really Really cute!

    Reply
  2. Ess

    February 09, 2011 at 8:16 am

    Love it, too cute! 🙂

    Reply
  3. Ess

    February 09, 2011 at 8:17 am

    This comment has been removed by the author.

    Reply
  4. Chris

    February 09, 2011 at 10:07 am

    I have awarded you the Stylish Blogger Award. Check it out @ http://usandthem1971.blogspot.com/2011/02/blogs-awards.html

    Reply
  5. Ashly@Moon Walk

    February 09, 2011 at 1:13 pm

    Great work Ash! Really cute project!

    Reply

Leave a Reply Cancel reply

Your email address will not be published. Required fields are marked *

Primary Sidebar

Hello Friends!

Ashley Phipps Simply Designing I'm Ashley Phipps and I love sharing SIMPLE DIY, home, travel, food, craft and essential oil ideas with you! Learn more about me here. Contact me here. Find Media/PR info here. Privacy is important to us. Please read my Privacy Policy.
  • Email
  • Facebook
  • Instagram
  • Pinterest
  • Twitter
  • YouTube

Join our mailing list

Get our latest updates & exclusive content!

Privacy Policy, Disclaimer & Terms of Use

Favorite Posts

image of guy in jeans installing lvp or laminate flooring - LVP vs LAMINATE FLOORING

LVP vs Laminate Flooring: Differences, Pros and Cons

body scrub recipe book

Body Scrub Recipe Book with 20 Scrumptious Recipes


COPYRIGHT: You’re welcome to link to Simply Designing or use a single image with a brief description to link back to any post. Republishing posts in their entirety is strictly prohibited.  Any use for commercial purposes is strictly prohibited. Feel free to pin on Pinterest. Find out more in my Privacy Policy.  Simply Designing with Ashley Phipps LLC is a participant in the Amazon Services LLC Associates Program, an affiliate advertising program designed to provide a means for sites to earn advertising fees by advertising and linking to Amazon.com . Simply Designing with Ashley Phipps LLC and it’s owner, employees and affiliates are not liable in any way for injury or loss (whether physical, emotional, monetary or any other kind of loss) resulting from any inspiration, ideas, directions or information gained from this website. We advise you to always follow manufacturer instructions, take appropriate safety precautions and hire a professional when in doubt. We love it when you use our site for inspiration, but by using it, you agree that you do so at your own risk.

Privacy Policy 

Copyright © 2025